Friday, January 29, 2010

Kill QTP Using Your Mobile Phone

If you want to kill QTP when you are not in your work place, then try the below technique. But you need MS Outlook in your remote PC and mobile phone with GPRS.

Step 1:

Create a VBS file with the below code and save it wherever you want it in your PC,

Option Explicit

Dim objWMIService, objProcess, colProcess

Dim strComputer, strProcessKill

strComputer = "."

strProcessKill = "'QTPro.exe'"

Set objWMIService = GetObject("winmgmts:" _

& "{impersonationLevel=impersonate}!\\" _

& strComputer & "\root\cimv2")

Set colProcess = objWMIService.ExecQuery _

("Select * from Win32_Process Where Name = " & strProcessKill )

For Each objProcess in colProcess

objProcess.Terminate()

Next

WScript.Quit


Step 2:

Open notepad, paste the below code and save it as bat file (I.e. .bat format)

C:\WINDOWS\system32\cscript.exe "C:\Documents and Settings\Administrator\Desktop\testbat.vbs"

Make sure to mention your VBS file’s location in your bat file.


Step 3:

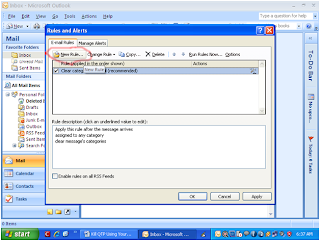
Open Outlook and select Tools->Rules and Alerts…


Click on New Rule
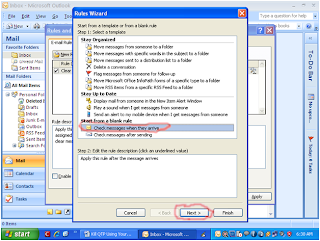
Select ‘Check messages when they arrive’ option and click on ‘Next’ button.
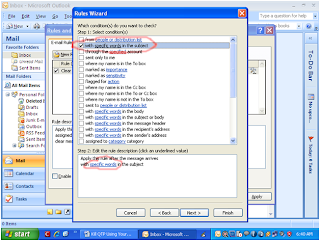
Select the checkbox as same as below and click on ‘specific words’ link.
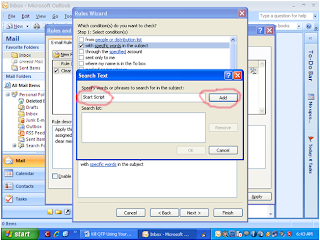
*Type any text in the below indicated textbox, click Add button and press OK. Here I have typed ‘Start Script’ and this is also my email's subject. This is case sensitive. While sending email ‘Start Script’ text should be your email’s subject.
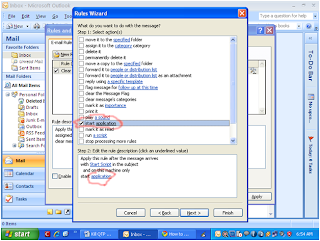
Select start application checkbox as same as below and click on application link. Then you have to browse the bat file which you have just created in the Step 2: and click on Finish button.
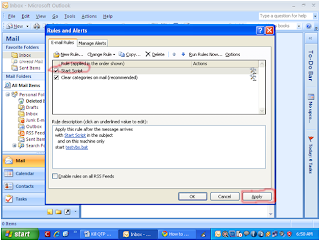
And finally you will see the new rule in Rules and Alerts window as same as below and click on ‘Apply’ button.
Now you are ready to kill your QTP from remote place. Just send an email to your email address through your mobile phone. Note: Your MS Outlook application should be in active mode in your remote PC.

*The email’s subject should match with your rule specified word.

After sending the e-mail, QTP exe will be killed from your remote PC.


Please let me know if you face any issues.

Saturday, January 23, 2010

Make Your QTP Script Talk

Make your QTP script talk to you. Try the below code, the script will tell you the current iteration number. Before running the script, please switch on your PC's speakers.

Set oVoice = CreateObject("sapi.spvoice")
oVoice.Speak "Iteration "&Environment.Value("TestIteration")
Set oVoice =Nothing


Reference: http://en.wikipedia.org/wiki/Microsoft_Speech_API

Sending An Email Using QTP DOT Net Factory

Sending HTML formatted e-mail using QTP DOT Net factory. In the below code I have used Gmail account. You may try with other accounts also.

Dim vStUserName,vStPassword,vStServerName

vStUserName="Gmail Account Username"'Enter your Gmail Account User Name
vStPassword="Gmail Account Password"'Enter Your Gmail Account Password
vStServerName="smtp.gmail.com"'Gmail SMTP Server Name

vStFromAddress="FromAddress@gmail.com"'Enter valid From Address
vStToAddress="ToAddress@yahoo.com"'Enter Valid To Address

Set oCredentials=DotNetFactory.CreateInstance("System.Net.NetworkCredential","System",vStUserName,vStPassword)
Set oSMTPClient=DotNetFactory.CreateInstance("System.Net.Mail.SmtpClient","System",vStServerName)
Set oMessage=DotNetFactory.CreateInstance("System.Net.Mail.MailMessage","System")
Set oFromAddress =DotNetFactory.CreateInstance("System.Net.Mail.MailAddress","System",vStFromAddress)

oMessage.From=oFromAddress
oMessage.To.Add vStToAddress

oMessage.IsBodyHtml=True'If your message to be formatted with HTML, then make this property value as True or else False.
oMessage.Subject = "GMail Test"'Subject of your email
oMessage.Body = " This is the test text for Gmail email"

oSMTPClient.Port = 587
oSMTPClient.Credentials=oCredentials
oSMTPClient.EnableSSL = True
oSMTPClient.Send(oMessage)

'Kill All the objects
Set oMessage=Nothing
Set oFromAddress=Nothing
Set oCredentials=Nothing
Set oSMTPClient=Nothing

Thursday, January 21, 2010

Screen Capture Of Lengthy Web page using Snag IT Scroll Method and QTP

If you have SnagIT and QTP together in your machine, then you will be able to take screen capture of a lengthy web page.

Try the below code and you should have both QTP and SnagIT in your machine. If you don't have SnagIT, please download the trial version of SnagIT and try the code.

Function Capture_Scroll_Image
Set objShell = CreateObject("WScript.Shell")
Set oSnag = CreateObject("SNAGIT.ImageCapture")


oSnag.Input = 1
oSnag.Output = 2
oSnag.OutputImageFile.FileNamingMethod = 2
oSnag.OutputImageFile.Directory = "C:\Documents and Settings\Desktop"'Make sure to specify your file path where you need to save your screen capture file.


oSnag.EnablePreviewWindow = False
oSnag.AutoScrollOptions.AutoScrollMethod=3
oSnag.OutputImageFile.LoadImageDefaults 5
oSnag.Capture()


wait(2)


objShell.SendKeys "{ENTER}"


Do Until oSnag.IsCaptureDone
Loop


Set
oSnag=Nothing

Set objShell=Nothing
End Function

SystemUtil.Run "Iexplore.exe","http://www.google.co.in"

Browser("name:=Google").Page("title:=Google").WebEdit("name:=q").Set "QTP"
Browser("name:=Google").Page("title:=Google").WebButton("name:=Google Search").Click
Browser("name:=QTP - Google Search").Sync


Call Capture_Scroll_Image'Calling the function to capture lengthy web page

Browser("name:=QTP - Google Search").Close


After running the script you will get the lengthy screen capture of the web page as same as below.


Adding Your Own QTP Tip Of The Day

If you want to add your own organization tip for QTP instead of predefined tips which are displayed in QTP start up page, then go to C:\Program Files\Mercury Interactive\QuickTest Professional\dat and open the Tips text file. In this file you can add your organization or training centers tips.

For example: I want to instruct the user to save all your scripts in D: drive.

After adding the tip for the above instruction in the Tip file, you can see the tip as same as below in your QTP start up page,


Friday, January 15, 2010

Balloon Tool Tip Trick in QTP Instead Of Automatic Timeout Message Box

If you are using automatic timeout msgbox in your QTP Script(s), then please switch over to Balloon Tool Tip. It is much better than VB script or WSH timeout message boxes.

For instance: If you want to know the current iteration number while running your scripts, then you may use automatic timeout msgbox using the below code.

Start_Time=Time

Set WshShell = CreateObject("WScript.Shell")
wshShell.Popup "Current Iteration No. "&Environment.Value("TestIteration"), 5 'Next step will not run until the time-out expires

SystemUtil.Run "Iexplore.Exe","
http://www.google.co.in"
Browser("name:=Google").Page("title:=Google").WebEdit("name:=q").Set "QTP"
Browser("name:=Google").Page("title:=Google").WebButton("name:=Google Search").Click


End_Time=Time
Msgbox Hour(End_Time-Start_Time) & ":" & Minute(End_Time-Start_Time) & ":" & Second(End_Time-Start_Time)


The above code has one drawback. When the msgbox is invoked, next step will not run until the specified msgbox's time-out expires.

Try the same scenario using Balloon Tool Tip code. The current iteration number will be displayed in System Tray and the script will not be stopped to display the tool tip.

icon_Path="C:\Documents and Settings\Desktop\6.ico" 'Choose any Icon file path from your PC. Make sure the file format should be .Ico.
Set oNtfy=DotNetFactory.CreateInstance("System.Windows.Forms.NotifyIcon","System.Windows.Forms")
Set oToolTip =DotNetFactory.CreateInstance("System.Windows.Forms.ToolTipIcon","System.Windows.Forms")
Set oIcon=DotNetFactory.CreateInstance("System.Drawing.Icon","System.Drawing",icon_Path)


Function fn_BalloonToolTip(vIterationNo)
oNtfy.Icon=oIcon
oNtfy.BalloonTipIcon=oToolTip.Info
oNtfy.Visible=True

oNtfy.Text = "QTP Info." 'Balloon Tool Tip Text Name
oNtfy.BalloonTipTitle = "Current Iteration No" 'Balloon Tool Tip Title
oNtfy.BalloonTipText="Current Iteration No. "&vIterationNo
oNtfy.ShowBalloonTip(5000) 'This line displays current iteration No in system Tray
End Function

Function fn_Kill_Balloon 'This function kills all the objects.
oNtfy.Dispose() 'After calling this method you will not see the balloon icon in system tray
Set oIcon =Nothing
Set oTool =Nothing
Set oNtfy=Nothing
End Function


Start_Time=Time
Call fn_BalloonToolTip(Environment.Value("TestIteration")) 'Calling balloon tool tip function


SystemUtil.Run "Iexplore.Exe","
http://www.google.co.in"
Browser("name:=Google").Page("title:=Google").WebEdit("name:=q").Set "QTP"
Browser("name:=Google").Page("title:=Google").WebButton("name:=Google Search").Click


Call fn_Kill_Balloon'Calling kill function

End_Time=Time

Msgbox Hour(End_Time-Start_Time) & ":" & Minute(End_Time-Start_Time) & ":" & Second(End_Time-Start_Time)

After invoking the fn_BalloonToolTip function, you will see the Balloon Tool Tip in your system tray as same as below,


In previous WScript code, the QTP script is waited until the msgbox timeout expires. Here QTP script will not wait for Balloon Tool Tip to be closed. The tool tip will remain in the system tray unless/until you call the fn_Kill_Balloon

I hope this technique will be useful for others also.

Please let me know if you have any questions in this.

Saturday, January 9, 2010

Working With Screen Capture in QTP

Converting PNG to JPG format

I have seen one question in Advanced QTP forum, that is the user needed to capture screenshot in JPG format instead of PNG.
QTP cannot capture snapshot(s) as JPG format, but we have an option to convert it using DOT Net Factory. I hope this code will be useful for all QTP users. So I have posted this in my blog.

Here is the code to convert from PNG to JPG

sImagePath="C:\Documents and Settings\TEMP\Desktop\cap.png"'Make sure to mention your destination path for snapshot

Desktop.CaptureBitmap sImagePath'Capturing as PNG format

Call ConvertJPG(sImagePath)

Function ConvertJPG(sBmpPath)

Set oBmp=DotNetFactory.CreateInstance("System.Drawing.Bitmap","System.Drawing",sBmpPath)
Set oDir=DotNetFactory.CreateInstance("System.IO.Path","mscorlib")
Set oFile=DotNetFactory.CreateInstance("System.IO.File","mscorlib")

oBmp(sBmpPath)

sNewFile = oDir.GetDirectoryName(sBmpPath)
sNewFile = sNewFile&"\" & oDir.GetFileNameWithoutExtension(sBmpPath)
sNewFile = sNewFile&"." &"JPG"
oBmp.Save(sNewFile)'Saving as JPG format

oBmp.Dispose()
oFile.Delete(sBmpPath)'Deleting the previous PNG file.

Set oDir=Nothing
Set oFile=Nothing
Set oBmp=Nothing
End Function

Tuesday, January 5, 2010

Working with Hashtable using QTP DOT Net Factory

Hashtable is similar to a Dictionary object. It stores values in key-item pairs. Hashtable can be implemented in QTP using DOT Net factory with .net framework mscorlib assembly.

The below line creates an instance of the Hashtable.

Set oHash=DotNetFactory.CreateInstance("System.Collections.Hashtable","mscorlib")

Now we are ready to work with Hashtable methods and properties in QTP.


Adding an element:
Syntax: Object.Add key, value

Example:
Set oHash=DotNetFactory.CreateInstance("System.Collections.Hashtable","mscorlib")
oHash.Add 1,"QTP"


Removing all elements:
Syntax: Object.Clear
Example: oHash.Clear
'This line clears all the elements in the Hashtable object

Counting Property:
The count property returns number of items in the hastable.
Msgbox oHash.Count


For more information about Hashtable, please navigate the below links,
http://msdn.microsoft.com/en-us/library/4yh14awz(VS.80).aspx
http://en.wikipedia.org/wiki/Hash_table
http://www.itl.nist.gov/div897/sqg/dads/HTML/hashtab.html

Saturday, January 2, 2010

Querying Text File

Most of the QTP developers are using delimited text file instead of datatable and data can be retrieved by using FileSystemObject. This is a good idea, but it has limitations which are listed in MSDN by Myer as follows,


No filtering. The nice thing about databases is that you can issue a query like "Select * From Logfile Where Result = 'Error'" and you'll get back only those records where the Result field is equal to error. That can't be done with the FileSystemObject. You might want only the records where Result is equal to Error, but you'll still have to read through the entire file, from top to bottom, checking the value of the Result field each time. That's not necessarily slower (the FileSystemObject is actually pretty darn fast), but it does make your code a bit trickier to write.

Difficulty in calculating statistics. Suppose you have a directory of some kind, and you'd like to count the number of people in each of your departments. With a database, you can issue a single query that will return that information in a flash. With the FileSystemObject, well, no such luck. Instead, you'll have to examine each record, and then use an array or a Dictionary object to manually tally up the number of people in each department. This will work, but it's tedious to code (and even more tedious if you have to change that code somewhere down the road).

One and done. Another problem with the FileSystemObject is that it's a one-way street, and a dead-end street to boot. What does that mean? Well, suppose you use the FileSystemObject to read through a text file and calculate a statistic of some kind. Now you want to read through it a second time, and calculate a second statistic. Oops, with the FileSystemObject there's no turning back: Once you get to the end of the file, you're done. You can't loop back through your file. Instead, you'll have to close the file and re-open it. Are there ways to work around this? Sure, but that's even more code you'll have to write.

Difficulty in getting at the individual fields. When you use the ReadLine method to read in a line from a text file, you get, well, a line from a text file. In other words, you'll get back something that looks like this:

Now we are able to overcome these obstacles by using Microsoft.Jet.OLEDB.4.0.

Step1: Create a text file as shown below and save it as CSV format at any location.

LastName,FirstName,MiddleInitial
Myer,Ken,W
Poe,Deborah,L

Step 2: Execute the code (Make sure to specify your text file's location in your code)
Const adOpenStatic = 3
Const adLockOptimistic = 3
Const adCmdText = &H0001

Set objConnection = CreateObject("ADODB.Connection")
Set objRecordSet = CreateObject("ADODB.Recordset")

'You need to specify the name of the folder where the text file is stored. Note that you must use a trailing \ in the folder name. In the sample script below, the path is C:\Databases.
strPathtoTextFile = " C:\Databases"

objConnection.Open "Provider=Microsoft.Jet.OLEDB.4.0;" & _
"Data Source=" & strPathtoTextFile & ";" & _
"Extended Properties=""text;HDR=YES;FMT=Delimited"""

'In your Microsoft® SQL query, specify the name of the text file you want to work with (in this example, PhoneList.csv).
objRecordset.Open "SELECT * FROM PhoneList.csv", _
objConnection, adOpenStatic, adLockOptimistic, adCmdText

Do Until objRecordset.EOF
Msgbox "Name: " & objRecordset.Fields.Item("LastName")
Msgbox "Department: " & _
objRecordset.Fields.Item("FirstName")
Msgbox "Extension: " & objRecordset.Fields.Item("MiddleInitial")
objRecordset.MoveNext
Loop

Enjoy!!!!!!!!!!!!!
Source: MSDN